Table of Content
Many of us who have a Raspberry Pi want to have access to it even from outside our network. Some use it to publish their blog or personal web page, others want to access a torrent server from which they can add downloads when they are not at home so that they are available when they arrive, and for others it could be a gateway to their entire home automation system, being able to control and monitor the status of their home when they are not at home.
If for any of these or other reasons you want your Raspberry Pi to be accessible from the Internet, I am sure you will find this post very useful.
The steps to access the Raspberry Pi remotely are not too complicated. In most cases we simply have to access the router or the portal that our operator provides us to “tinker” with its configuration and redirect the ports we need to the internal IP of our Raspberry.
Introducing Cloudflare
The online platform Cloudflare does a lot of things that can be useful in different situations (and besides, most of its features are free). Today in this article, we are going to focus on one of them: Cloudflare acting as a DNS server.
As you know, the Internet uses the so-called IPs as addresses of everything connected to it, but when we enter, for example, https://curiousstuff.eu, we do not put any IP in the browser bar, but we type an address. This is due to an invisible “help” that makes the Internet more “human”: the DNS.
Without going into technical “stuff”, we can say that DNS are servers that “know” in which address other servers are located, converting addresses written with alphabet (easier to read and remember for people) in IPs. So, for example, in the case of writing
http://google.es in our browser, thanks to the DNS server, we would actually be accessing something like 142.250.74.227.
| |
| |
Did you notice that
pingshows the IP142.250.74.227as the IP resolved for google.es?
That is! a DNS uses a kind of conversion table to go from URLs to IPs and CloudFlare allows us, for free, to make these conversions.
Issues of home networking
However, we encounter two problems:
In our house, almost 100% of the time we have a dynamic IP, that is, it changes over time and therefore we can not assign in that table of conversions.
We do not have a domain. The
.comor.esor any other tld domains are paid and their price varies between providers but we can set at 12€ the average annual price of a.comdomain.
On this last point, there are free alternatives for the user, so that some well-known companies give us for free a subdomain that is part of their own domain. I, for example, have used a lot noip.com, from where we can create a free subdomain such as rpi-homeland.hopto.org. This option is fine if you don’t have a domain already and you can’t get one, but it has the disadvantage that you will have to renew it every $N$ days (I think I remember it was every month) which in the long run becomes quite tedious.
Having a domain is better
So purchase one and then keep reading. Once we have purchased a domain, we have to point it to our home IP, which is dynamic and therefore changeable. This is where we have to use Clouflare and do a little magic ;).
Configuring Cloudflare as our DDNS
Step 1: define your subdomain in Cloudflare
We log into our Cloudflare account and go to Domains tab. You should see something similar to below image, for your brand new added domain in Cloudflare.
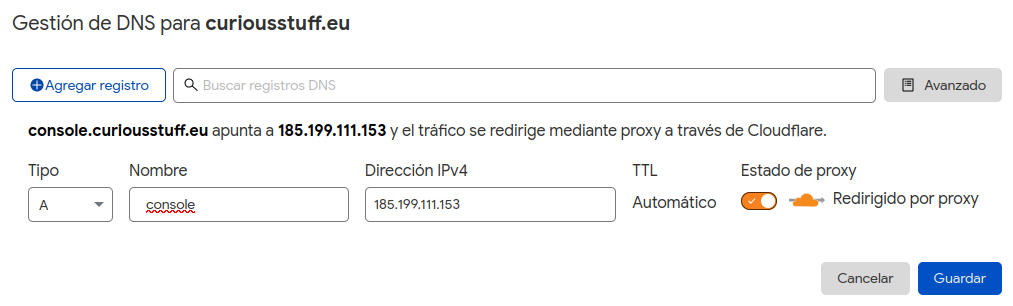
In the DNS tab click on add an A-record for our current home IP (remember that we are talking about the public IP, i.e. the IP that the router has facing the Internet). You can easily find it out through your Router management website or ISP provider
Note: if you don’t know the IP, just put a valid IPv4 in the field, for example:
185.199.111.153. We’ll take care later in the update process of setting the right value.
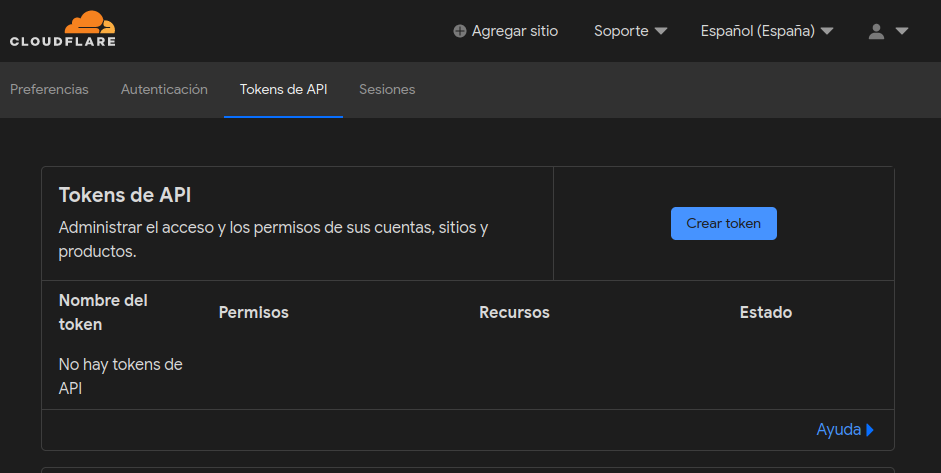
Step 2: Obtain a secret token to use Cloudflare v4 API
Once the subdomain is defined, we need to get a token in order to make authenticated API calls. To get this token you must go to Account > Settings > API Tokens. The tab content should be similar to
- Now click on
Create New Tokenbutton
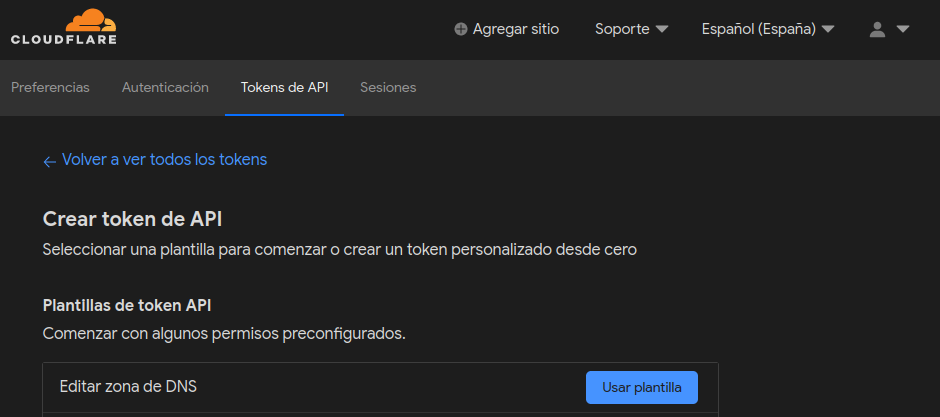
As you can see, Cloudflare already provides some common used token templates. In this scenario, we can use the template called:
- Spanish Name: Editar zona de DNS
- English Name: Edit DNS zone
- Use template
Edit DNS zone
Follow the process until you get your token and store it securely. For security reasons, cloudflare will only show you the token once.
Step 3: Log into your Raspberry PI
Using the Cloudflare API, we are going to update this value automatically so that it is always up to date. To do this, we access our Raspberry via SSH in order to get a session.
This is a required step, in order to execute following steps.
Usually, to log in, you should use a command like
| |
In the previous command, pi is the username you defined and rpi.local is the device name. you can also use the IP address to log in, of course.
Step 4: Download a Cloudflare DDNS updater
Download a DDNS updater in order to report the active device IP to Cloudflare.
Note: source code of
DDNS updatercan be found at https://github.com/zerjioang/ddns-cloudflare
| |
After executing previous commands, you should have a DDNS updater ready to be used and installed in your raspberry pi. Check the application exists with ls command.
| |
Configure the DDNS-Updater
In order to update your specific DNS record of your registered DNS domain, there are some things you need to configure. In this example, the 3 environment variables used by the ddns-updater are persisted to $HOME/.bashrc so that all session can have available those variables with their right content.
To write variable content to our .bashrc file
| |
to launch the DDNS updater
| |
Previous command will try to update the DNS A Record of rpi.example.com with the host actual public IP
Adding a cron job
In order to refresh the current device IP every specific time window, we can use crontab for example.
Access to your cron file with crontab -e and add the following content. For example, in order to update the device IP eery 10 minutes you need to add
| |
You can verify the content of the crontab file with crontab -l. Your new crontab file should look like
| |
I need to understand better how crontab settings are configured, I recommend you to use https://crontab.guru/ if you want to easily learn how to configure the crontab timing.
A success execution
If everything went like planned, a success execution should generate following logs.
| |
After a success execution, you can go to your CloudFlare user dashboard and verify that the IP has indeed been updated.
Conclusion
And now we have ready, and permanently, an address to point from the Internet to our router, which in turn, it will be redirecting the traffic to our Raspberry if we have configured it well.
I hope this post has been useful. Now you can easily access your music, your printer or your devices taking advantage of your domain and, if you have followed these steps, it will not have taken you more than 10 minutes all the configuration.
Subscribe, donate or become premium
💬 Share this post in social media
Thanks for checking this out and I hope you found the info useful! If you have any questions, don't hesitate to write me a comment below. And remember that if you like to see more content on, just let me know it and share this post with your colleges, co-workers, FFF, etc.