
Table of Content
What is WASM
WebAssembly (abbreviated Wasm) is a binary instruction format for a stack-based virtual machine. Wasm is designed as a portable compilation target for programming languages, enabling deployment on the web for client and server applications.
The official documentation of WASM can be found at https://webassembly.org/
How fast WASM is?
The Wasm stack machine is designed to be encoded in a size- and load-time-efficient binary format. WebAssembly aims to execute at native speed by taking advantage of common hardware capabilities available on a wide range of platforms.
Is WASM memory safe?
WebAssembly describes a memory-safe, sandboxed execution environment that may even be implemented inside existing JavaScript virtual machines. When embedded in the web, WebAssembly will enforce the same-origin and permissions security policies of the browser.
What browsers supports WASM?
In November 2017, WebAssembly CG members representing four browsers, Chrome, Edge, Firefox, and WebKit, reached consensus that the design of the initial (MVP) WebAssembly API and binary format is complete to the extent that no further design work is possible without implementation experience and significant usage.
After the initial release, WebAssembly has been gaining new features through the standardization process. For the complete list of current proposals and their respective stages.
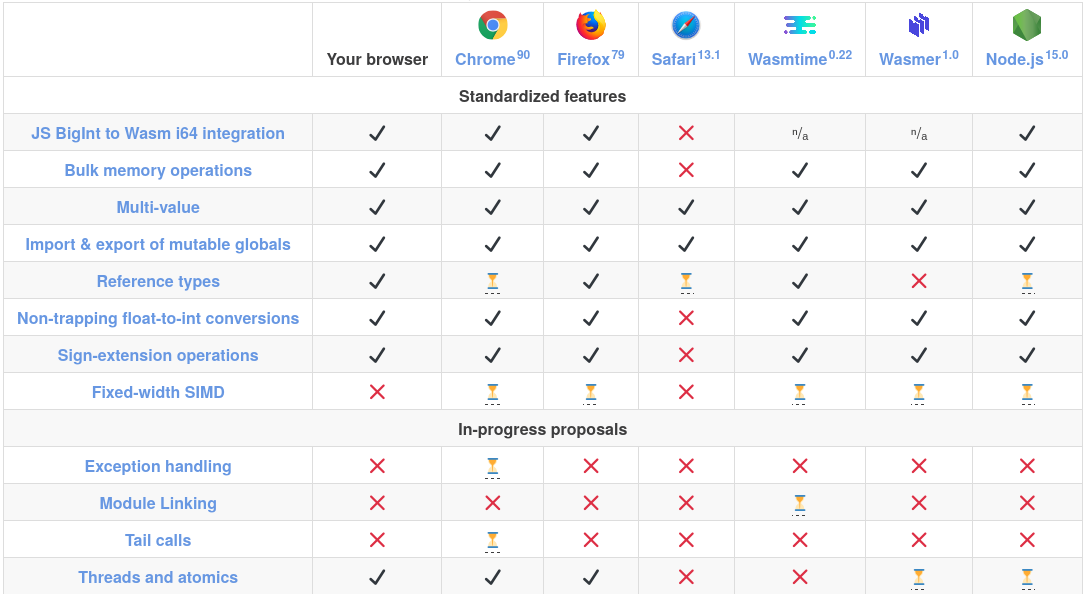
What features are implemented on each Browser?
That depends on the target browser. As a reference, you can take a look to following table
How to create a WASM application in Go
To create a WASM application in Go, there are several constraints that needs to be met. From my point of view, the most recommended one is that WASM files should always start with
| |
to tell Go compiler that those files are WASM compilation variant only.
WASM development constraints and limitations
When working with Go and WASM there are some limitations that we need to be aware. Those basic limitations are known as
- Package
"syscall/js"needs to be imported to have access to Javascript bindings and some features. - Function
mainmust register all Go functions that we need to expose to JS using methodjs.Global().Set(functionName, fn). - Function
mainmust keep running during whole WASM module lifetime to avoid premature exit. To do this, a channel implementation can be used. - All exposed JS functions must have same function signature as:
func functionName(this js.Value, args []js.Value) interface{}
Example WASM exercise
To show you how to build your first WASM application, we are going to build a simple WASM module that expose function Add. This function Add will sum two integers and return their sum value as:
$$ c = a + b $$
Simple, right?
Final complete example
The complete add.go file should be similar to this
| |
Compile GO code to WASM
To compile our previous add.go file, we need to tell Go compiler to generate a WASM file instead of the default binary. The required parameters that needs to be define on compilation command are GOARCH and GOOS. The command to compile wasm is:
| |
That will build the package and produce an executable WebAssembly module file named add.wasm. The .wasm file extension will make it easier to serve it over HTTP with the correct Content-Type header later on.
Note that you can only compile main packages. Otherwise, you will get an object file that cannot be run in WebAssembly. If you have a package that you want to be able to use with WebAssembly, convert it to a main package and build a binary.
Compilation result
The compilation result of executing go build for WASM should be afile with *.wasm extension as shown below
| |
We specified a custom file name with -o add.wasm parameter.
Run Go compiled WASM in the browser
To execute add.wasm in a browser, we’ll also need a JavaScript support file, and a HTML page to connect everything together.
This support file is known as the glue that makes possible the interaction between WASM module and JS environment. Copy the JavaScript support file (provided by Go language files) with
| |
WARNING: You are required to have setup
GOROOTenvironment variable before running previous command. Otherwise copy command will fail. By default, the value ofGOROOTis/usr/local/go/misc/wasm
This wasm_exec.js file needs to be included in your html. As a reference, below example is given:
| |
Once the index.html file is created, serve the three files (index.html, wasm_exec.js, and add.wasm) from a web server. For example, with Python basic server, run:
| |
Now, visit http://0.0.0.0:8000/ on your web browser, open Developer Console and you should see the output of the sum $20+10$ on the screen.
To finish serving files, go back to Python application and press Ctrl+C to exit
| |
Subscribe, donate or become premium
💬 Share this post in social media
Thanks for checking this out and I hope you found the info useful! If you have any questions, don't hesitate to write me a comment below. And remember that if you like to see more content on, just let me know it and share this post with your colleges, co-workers, FFF, etc.