
Table of Content
Blazinly fast PRNG 64 bit are here
Sometimes, we require to have an identifier in order to store things, track behaviours etc. In this scenario, I was required to rapidly generate ID strings in order to be used as Request ID for an HTTP service. Those IDs would be included in HTTP service response X-Request-ID header and tracked in Opentracing. I did some initial implementation and saw a performance degradation that I did not like it. That’s the main reason to dig deeper in Go PRNG generator, to see how it works, and make some tweaks.
Warning

The IDs created by this algorithm are not pure random nor based on a secure entropy origin. Do not use them for any crypto related stuff. If you want secure random IDs or low collision probability IDs, see crypto/rand package at https://pkg.go.dev/crypto/rand#Read
Creating IDs: the common way
I say it’s the common way because is the method used by many developers, as show in StackOverflow questions and other Internet resources:
- https://stackoverflow.com/questions/39925784/how-to-generate-unique-random-number-in-go-using-standard-library
- https://gobyexample.com/random-numbers
- https://flaviocopes.com/go-random/
- https://www.calhoun.io/creating-random-strings-in-go/
- https://golang.cafe/blog/golang-random-number-generator.html
- https://www.educba.com/golang-random-number/
So, Let’s follow this idea and assume we have a function gen() that creates a hexadecimal encoded UUID of $8$ bytes. The function can be described as follows:
| |
And that’s all, the easiest way to create a random ID in Go, that creates outputs like
| |
Run it many times, and you will get different results each time.
gen() function description
There are several things gen() functions does under the hood:
- At the beginning,
gen()allocates a new byte slice to hold 8 bytes. - Next, it fills the byte slice positions with pseudorandom values calling the function
rand.Intnin where returned values will be in range $[0, 255]$, the range of thebytedata type. - Finally, it encodes the
[]byteslice result as hexadecimal and converts it to string
gen() function known allocations
As we know from other optimization post series such us Lightning fast stock market data parsing, we know that
[]byteslice conversion tostringrequires allocating memory.
gen() function known optimization points
As we know from other optimization post series, we know that
EncodeToStringmethod of packagehexmakes an additionalloopover input data. In this specific case, this extra loop could be avoided processing all in same initial loopfor i:=0; i<8;i++.
However, this time, we need to focus on rand.Intn implementation to see how it works, and if we have room for improvements.
After, analyzing internal code of rand.Intn the conclusions are:
- It has an internal data access lock to support concurrent code. We can remove this lock, and delegate this responsability on callers. This change will create an speedup on
prnggeneration code. rand.Intncalculates the maximum size of the random number range, and applies different logic if number max value is $2^n$ or not. Since our max range is $256$, we fullfil the condition of $256 \equiv 2^n \equiv 2^8$
Finally, there are other minor tweaks we can do, on original function, such as:
- use custom data type to tell Go compiler the expected size of slices instead of using
[]byte - expand loops
Optimization steps
1. Replace []byte with a custom data type
In order to avoid data allocations as much as possible it is highly recommended to use custom Go data types when possible. In this scenario we need to replace our original byte slice with a custom data type. For this reason, we create a custom struct called RandUUID
| |
As you can see, this struct doubles our initial size of $8$ bytes. The reason for this, is that its ready for holding the result already encoded as hexacimal, and hex format requires $2n$ bytes, being our original size $n=8$ bytes.
2. Generate a non-negative pseudo random number
In our original example, in where we call dst[i] = byte(rand.Intn(256)) we are generating on each loop round, a pseudo random number. However, internally, the pseudo random number generator, will generate a int64 number for each round.
Luckily for us, with a single int64 number we can fill our original []byte slice of size $8$ and we can avoid the additional calls to rand.Intn, so instead of making $8$ calls, we make just $1$. We make this single call using the modified function Int63() defined below.
| |
Original implementation of
rgnSourcecan be found online at https://golang.org/src/math/rand/rng.go and https://github.com/golang/go/blob/master/src/math/rand/rng.go
The trick here, is that we need to process the returned int64 number to fill the []byte slice correctly.
3. Processing the 63-bit integer as an int64
In order to process the generated int64 by function Int63(), we need to make some byte level processing. In this case, we do some right shifting for each othe bytes we need to get. Since our []byte slice is of $n = 8$, we need to make $8$ shifting as follows:
| |
At this point, our result RandUUID contains the $8$ bytes filled in their expected positions.
Did you notice we did not fill the slice in sequentical positions?
This is because, we are using the same slice to hold final result encoded as hexadecimal format.
4. Convert our result to hexadecimal format
Our hexadecimal conversion of the []byte slice to string will be based on hex/encoding Go package function EncodeToString which is described at
https://pkg.go.dev/encoding/hex#EncodeToString. The function indeed, has the following signature
| |
It receives a []byte slices, do some computation and converts the result to string
However, we need to tweak the function to:
- Do not allocate a new
[]byteslice for the result - Avoid data conversion betweeen
[]bytetostring
Taking a brief look to EncodeToString we discover the simple logic used to convert an arbitrary byte slice to hex format.
| |
So the final tweak we need to do, is to expand the loop. We can do this, because we have a fixed size input slice, that will be always constant with a value of $n=8$
4.1 Expanding the loop
To expand the loop, we just need to execute manually the $8$ iterations as follows in order to convert the data to hex format.
| |
Measuring performance
After all our efforts of having a fast prng, we need to measure in order to be sure of our results. To do so, we use Go built in benchmarking tool as follows:
- Compute a benchmark on our base
gen()function and save it asold.txt - Apply all our changes to
gen()function - Compute a benchmark on our modified
gen()function and save it asnew.txt - Check results between both algorithms using
benchstat
1. Compute a benchmark on our base gen() function and save it as old.txt
| |
| |
2. Apply all our changes to gen() function
Apply our changes to the code.
3. Compute a benchmark on our modified gen() function and save it as new.txt
| |
| |
4. Check results between both algorithms using benchstat
In order to find if we have some performance gain or decrease, we compute the difference using benchstat tool comparing our both old.txt and new.txt files.
| |
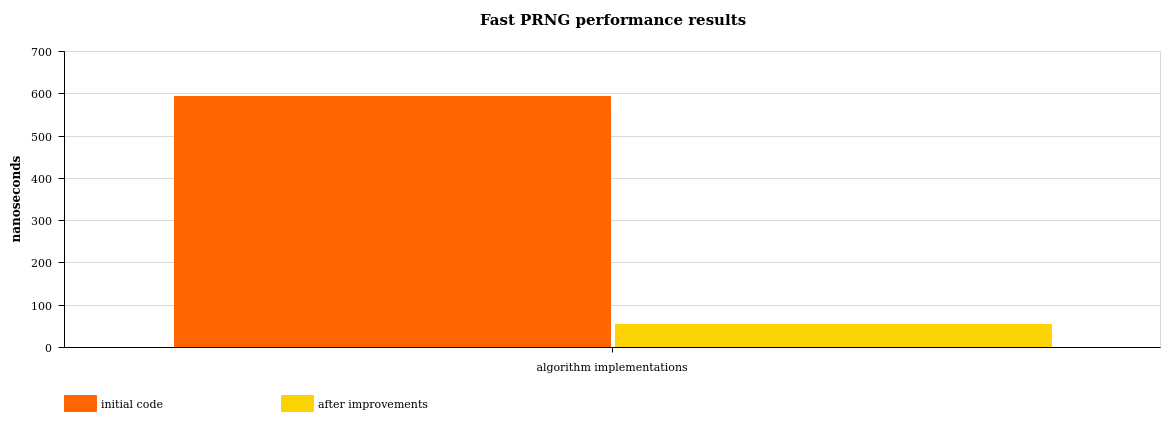
Putting results of time/op in a graph, we get a clear view of the performance improvements of that +90%
Final results
I show you how you can optimize programs and algorithms using a real example. As a gift, I assembled a library you can use as additional tool to create IDs, and published the library as opensource at Github. It’s up to you if it fits in your needs or not.
Example Go script
| |
Creates the output
| |
being +90% CPU and +970.22% memory faster with zero allocations.
Get the code at Github
You can download the code of the prng at Github visiting
https://github.com/zerjioang/prng or you can import it in your Go project as module/library as
| |
References
Subscribe, donate or become premium
💬 Share this post in social media
Thanks for checking this out and I hope you found the info useful! If you have any questions, don't hesitate to write me a comment below. And remember that if you like to see more content on, just let me know it and share this post with your colleges, co-workers, FFF, etc.